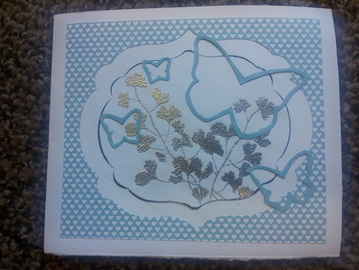
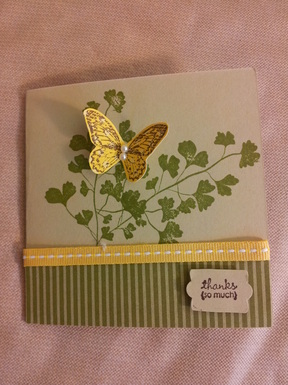
 I was teaching a class the other night and while the ladies were creating away I started picking some of the scraps out of the recycling bin (only because I didn't bring anything extra of my own to work on - not because I can not let a single piece of paper go to waste) and I ended up just creating a little something. The outside blue heart frame was left over from cutting out with the labels framelit and the butterflies were leftover from the Beautiful Butterflies embosslit. I embossed with silver on a small inked frame and voila!
It is SO easy to be creative with Stampin' Up! stuff - I love that about this company!!
Me = Happy Crafter :)
Tomorrow is the last day of Grade 3 for my oldest son, Liam. He has been counting down for like... 3 weeks! Every day!The time has finally come - SUMMER VACATION! Yahhooo!
Here is my newest 12x12 page that just screams SUMMER!!  I got to CASE this layout from Vicki Boutin in the new Summer edition of the Scrapbooks and Cards Today Magazine.  Lots of fun with circle punch masks, ink, and the new Travel Journal Wheel. 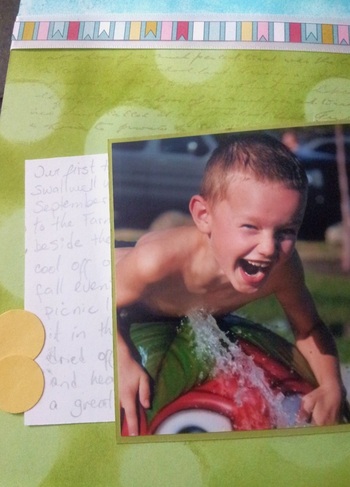 A little bit of hidden journalling. I can't believe it...all this blogging and this is the first scrapbook page layout post!
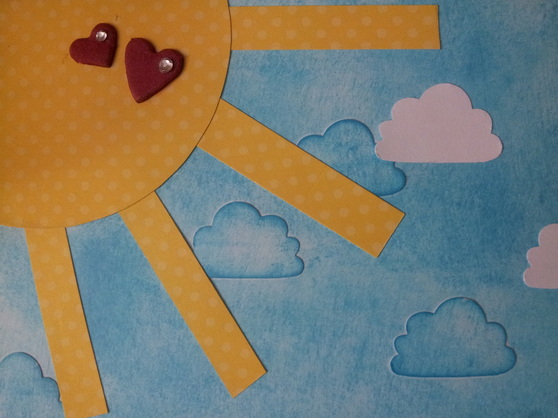
Here's hoping that this added a bit of sunshine to your day :D
You know in those craft magazines how they often interview designers and they always ask them, "what's the one craft supply that you could not live without?" My answer comes very easily - its PAPER! The designer series papers from Stampin' Up! are no exception. Following on my obsession is technique theme this month - paper folding. This is a new for me - but there are so many options when you start looking. Here are the projects I came up with:
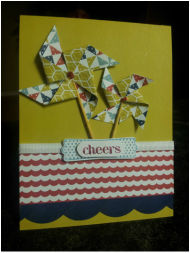
Summer Starfruit and Midnight Muse cardstock, Whisper White 1/4" stitched grosgrain ribbon, New Happy Hour A Fitting Occassion stamp sets and Pinwheels on Parade Simply Scrappin Kit
|
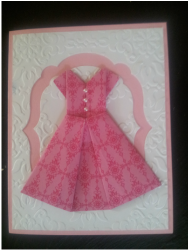
Regal Rose and Whisper White Cardstock, Brights Designer Series paper, Vintage Wallpaper Folder, and Pearl Jewels
|
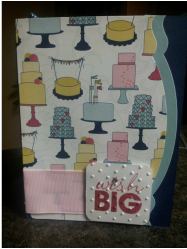
Midnight Muse, Pool Party, and Whisper White Cardstock, Patio Party Designer Series Paper, Pink Pirouette 1 1/4" Grosgrain ribbon, Midnight Muse 3/8" stitched satin ribbon, Word play and Create a cupcake stamp sets
| You may be thinking to yourself, "ok, I can see that the pinwheels and the dress are folded, but I've been really staring at the third card and can't see anything paper-folding." Well, I say to you, that is because the magic is folded up inside!

Card design courtesy of Lisa Young at addinkandstamp.blogspot.ca. Thanks for sharing Lisa!
Ta da! Who doesn't love pop-up cards? And, yes that totally counts as paper-folding.
Last week was our Kaleidoscope Stampers Extravaganza but so much has happened I'm just posting about it now. Anyways, our Extravaganza is a special evening with a group of Stampin' Up! Demonstrators to play with the new products (BTW, the comraderie and friendships I've made through Stampin' Up is one of my favourite and unexpected perks). Desiree Spenst, our wonderful leader, hosted a scrumptious potluck dinner and provided fun games and amazing projects for us all (you can check her out on Facebook). Here are two of the cards we made. 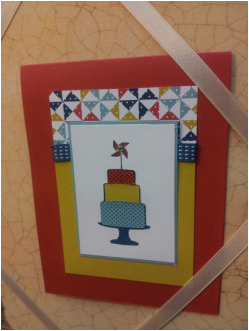 *NEW* Make a Cake Stamp Set, Riding Hood Red, Summer Starfruit, and Marina Mist Cardstock, Pinwheels on Parade Simply Scrappin' Kit, and Midnight Muse 3/8" Stitched Satin Ribbon | 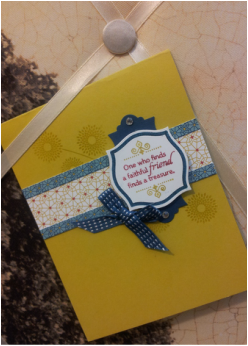 *NEW* World Treasures Stamp Set, Summer Starfruit and Midnight Muse Cardstock, Pinwheels on Parade Simply Scrappin Kit, Apothecary Accent Framelits, and Midnight Muse 3/8" Stitched Satin Ribbon, | Desiree also designed a min album for us to make tonight out of three envelopes and used pieces of the Pinwheels on Parade Simply Scrappin' Kit to embellish - I was in heaven!! You might not know this about me yet, but my favourite projects are mini albums. Look how cute this turned out - and it was really simple too. I can't wait to add my pictures and journalling. 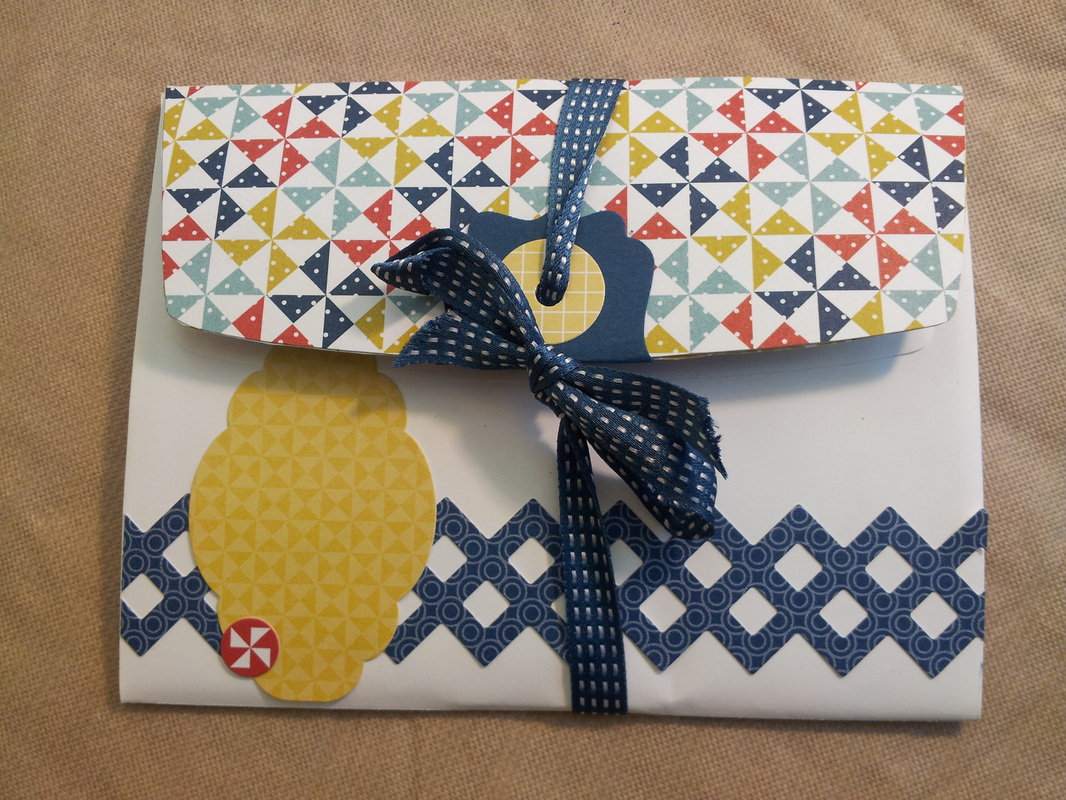 Here is the outside all tied up. |  All opened up with tons of space for pictures and cute spots for titles, journalliing, mementos, and more! | If you are curious about joining our team, give me a call anytime. I'd be more than happy to share my story and provide more information.
PS. It's a really good company that really takes care of their demonstrators - affordable and great benefits - just sayin...
In the middle of the month I post a new color scheme intended to inspire. Enjoy these subtle June tones.
BTW, I would love to see what the Colour Suite encouraged you to make.
Brought to you by The Color Suite from Scrapbook & Cards Today
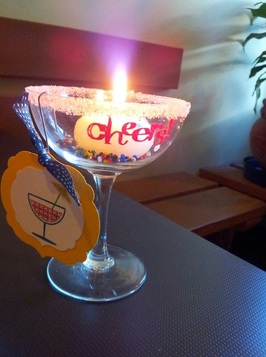 Our friends from Okanagan4Kids put on a Ladies Fiesta and Fashion show this evening. The fashion show featured Le Cheap C'est Chic Clothing in West Kelowna and Sims Jewelry Co. and was hosted at The Bike Shop Cafe. I had a lot of fun seeing friends and making new ones. The food and drinks were fabulous, the clothing and jewellry was gorgeous. I happily contributed centepieces for the tables which I made out of little goblets heat embossed with the new Happy Hour stamp set. Then I hung a stamped margarita image on the rim and embellished with a small ribbon tie. I added some bright coloured beads and a candle and voila! Can't wait to do more events like this one - so fun!
 Card-making has turned me into a more grateful person.
I never knew saying thanks could be so pleasant. I now really enjoy making cards to extend my appreciation to others. For even the small things.
What a great feeling.
And it totally snowballs.
Because the person is grateful for me being appreciative.
And I can only IMAGINE where it could go from there......
NEW Papaya Collage Stamp Set
NEW 1/4" Stitched Grosgrain Ribbon (Daffodil Delight)
That's the tagline that is supposed to follow my blog titile.
Got Stamped.....Better than getting Punched. <- Insert spontaneous gutteral laugh here.
Anyways,
| | Punches are something that are COMPLETELY new to me. No joke. I have been papercrafting for over 10 years, but have never owned a punch. In fact, I only
saw someone use them for the first time last year. This isn't to say I never cut anything out, OH NO, I was a hand-cutter. <- Insert appalled gasp here.
Yep, I have hand-cut everything from flowers, to circles, to tags, to edges, to intricate calligraphy titles. I've done it all.
Now that I have been introduced to punches, they are like this magical unicorn, which I could imagine but never knew truly existed. I mean to say, I like them... a lot. So, I use them... a lot.
I REALLY like the effect of punching out someone, oops, er, I mean something (Ha ha!) and allowing a different pattern to peek through. |
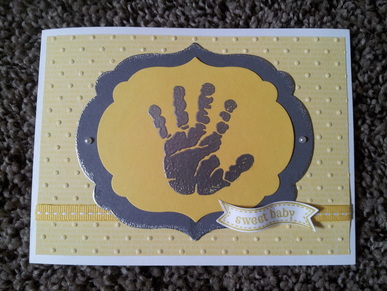 I will admit that I am totally new to this whole card-making thing. And I am secretly liking it. Anyways, I was asked by a friend to make a baby card (which was flatering and a bit nerve-wracking considering I am a newbie). Trying to come up with a unisex but classy card had me searching high and low for inspiration. I have met some wonderful new friends with Stampin' Up and one of them (Tamara Casorso) inspired me with their favourite color combination: Yellow and Grey. As this card came together I loved it more and more - elegant, sentimental, and a touch of whimsy. You will probably be inspired by Tamara too - she is one creative chica. Check her out at http://www.sweetstampinspot.blogspot.ca/
You may have to see this technique to believe it. This technique transfers a wax image of your stamp onto paper which then resists the ink that you then apply, leaving the white paper to show through. Not only do you get a completely different look to your image... it's SUPER easy! Here's how you do it: Place your stamp on your table stamp-side up. Cover the image with a piece of wax paper. Cover the wax paper with plain white cardstock. Now press a hot iron on the paper. This warms the wax and transfers the stamped image to the cardstock . You will be able to see a very light wax image. To really see the effect rub ink over the carstock using either the ink pad or a sponge.
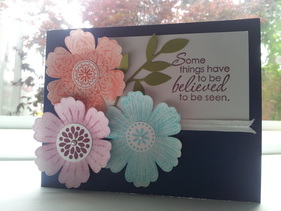
The stamped image can't be too detailed or it just comes out like a blob. I found that the Mixed Bunch stamp set worked perfectly for this technique. | | We tried out all three mixed bunch flowers for this card and inked them with Calypso Coral, Pool Party, and Rich Razzleberry. Then we punched them using the Blossom Punch. The inside of the flower we inked the same color with the other Mixed Bunch stamps and punched them out with the 1/2" and 3/4" circle punches, and added Pearl Embellishments. The little leaves Sizzlit added the perfect little accent with the sentiment from the Just Believe stamp set.
Update: I added a little of the new 2012 1/4" stitched grosgrain ribbon as a last touch |  I had an extra blossom after all of this, so decided to put it to use. Here is another card with the same Little Leaves Sizzlit and I added in the Beautiful Wings Embosslit. The sentiment is from the new 2012 catalogue called Itty Bitty Banners and cut out with the coordinating Bitty Banners Framelit. This card also got a strip of the 1/4" stitched grosgrain ribbon.
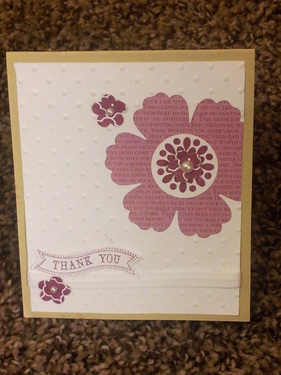
I made this simple elegant card for my Grandmother-in-law's 85th birthday! She loved it :)
|


 RSS Feed